Saturday, December 19, 2020

"... Presence of wonder..."


"always be on the lookout for the presence of wonder." -e.b. white


If you have been following me, you know that I love crumb piecing.
Several months ago I had a few 2.5" crumb blocks on my design wall.
I thought I had blogged about them but I couldn't find the update. Maybe I had only posted to Instagram and FB...


Ahh... yes. Scrolling through my photos, it seems I had intended to blog about how I decided to proceed with these 2.5" crumb blocks..


ah, well, that was put aside to work on an idea my Sweets had. And THAT was put aside to work on a quilt top for work. That quilt top was completed, displayed in the store, and now back with me waiting to be quilted...

At the moment, I have several projects that are at the top of the list to be working on.
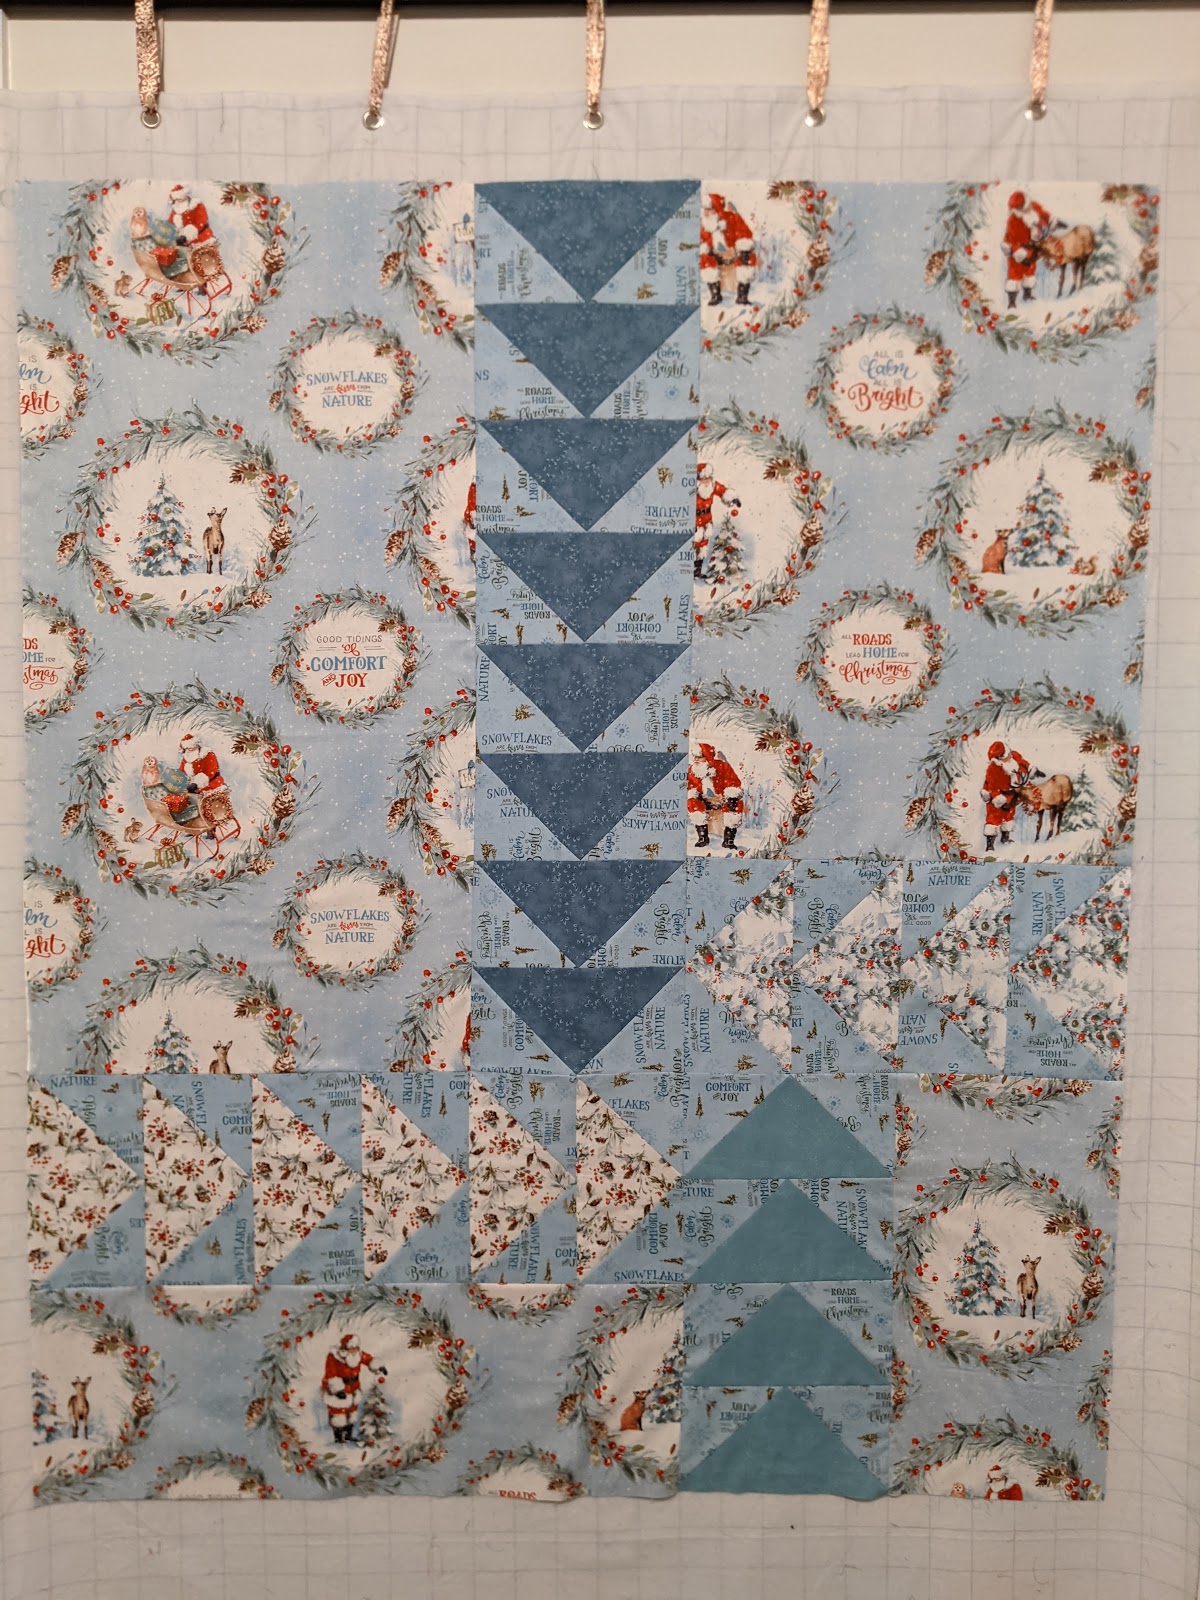
- Bonnie Hunter's 2020 mystery quilt - Grassy Creek. Pictured here is Part 2 and BH has just release Part 4!


- 3rd Thursday BOM that I guess I'm in charge of at work. It starts in March.
I have picked out colors for the first 5 blocks and should get started with the piecing...


- I need to plan my classes for the new year.
first on the list is a workshop for The Tree of Life...

- I have my son's fiance's quilt on the design board...
and a solid plan for finishing!


- and a christmas present that I can't give a picture yet...

so, with all those "priorities," what am I doing??
I'm playing with crumbs! 
But it's even worse than that. 
I'm playing with cast off bits from other quilters!
cast off bits from the garbage bin 🤯
Wait, wait... it's not as bad as that sounds. In the classroom at work there is a basket designated for fabric bits. It's for clipped thread, trimmed batting, trimmed "dog-ears," and extra fabric trimmed from blocks and the piecer considers it too small to bother with. This basket usually goes to someone that makes doggie beds and is used as the filler.

I passed by this basket several days. Averting my eyes. Determined not to rummage through the pile for the bigger pieces.  I have plenty of my own bits to keep me busy for years!
But the colors kept luring me!
I could hear the story these bits were telling. 
They were from at least three different quilters,
 three different projects happening in the classroom.
The golds and greys are probably from the Grassy Creek group.
I am guessing the reds and creams could be from the American Jane Gems and Jewels BOM the store is doing right now. 
The purples, pinks, turquoise are a mystery to me. They must be from a customer working on her own project in a Sew Day group. Maybe she'll read my blog and recognize her fabrics 😊. Wouldn't that be something!?

 All of this in the above photo came from the fabric "waste" basket. 
Strings and triangles that I pieced into something wonderful.

The piecing technique is very improve. 
The piece on the left has a selvage pieced in that has the word "cotton." 
Because of these two things, I am reminded of my Mississippi quilt friend Julia Graber, who took me on my Cotton Adventure and she did a class on improve piecing for our PTQ guild at my request. She's a wonderful, generous, incredible woman and I am blessed to call her friend.

I should say that the light turquoise that frames that piece is from my own stash. It's a perfect size for a small wallhanging. I intend to finish it and hang it in the guest restroom in my house! I'm excited to start using my quilts in my own home decor!

I haven't decided what to do with the other pieces yet. I'll let them speak to me in their own timing. There's no rush to make them into something right now.

But how perfect is it that in the pile of bits there would be a selvage edge with the quote, "always be on the lookout for the presence of wonder." -e.b. white!
It makes me feel like it was all Meant To Be!!

Thanks for visiting. 
Happy Quilting / Creating to you!!

Sunday, November 8, 2020

Catching up my blog updates...

Hi there! It's been a little while since my last update. I guess I haven't found a balance between work stitching and personal stitching.  I've been hesitant to blog about work stuff. However, I am kind of coming to the realization that it may be one and the same. 🥰

I don't have anything in particular to blog about today but I don't want to put off an update any longer.

So, I looked through my photos to see what might pics I have there since my last blog update.  I was surprised to see quite a bit...


I made up some needle book kits for work, based on the Needlebook tutorial my nanaCompany


I don't have a picture of the finished needle book from the kit, but here are the needle books I made at home from nanaCompany's tutorial. It's a very easy fast fun little project!
Needle book front

Needle book back


The Old Craft Store is doing Edita Sitar's 6-week Alaska Rainbow Quilt Along...


I joined in with the idea of hand-piecing it... Tomorrow we'll be on week 5, I'm still stitching week 1.😂


I made a Christmas sample for the OCS (the Old Craft Store)


I even enjoyed following the directions and cut ALL the pieces before stitching anything together!  That might be a first time for me. Once I start a quilt I usually cut just a few pieces because I can't wait to get to the stitching part!


We made up kits. The pattern is in the "Best of Moda Bake Shop: A Sweet Batch of Quilts Perfect for Precuts" compiled by Lisa Calle.


Halloween came around. Chewie wasn't amused, nor bothered, by the spiders we invited into the house.


Sometime in October, my Tree of Life quilt top moved into the front room at the OCS!
I admit that I quite enjoy hearing customers admiring it 💕


And at the moment, I am putting together another quilt top to be a store sample.
I found the pattern at Connecting Threads. It's called the Subway Quilt Pattern by Sewing Sue.


To be honest, this has been love/hatedislike with this pattern. The design is fantastic! 
But there is much too much waste in the stitch and flip method. For me, the stitch and flip method is not really the most accurate, and matching the seams is a challenge now that I'm finally at the part of connecting blocks.

Part of the cause for this was that I switched sewing machines in the middle of completing the blocks.  The difference in the presser feet and needle positions makes a difference in seams! even with the stitch and flip technique.
Another cause is that when my flip ended up being too short, I resorted to over-compensating the seam and then trimming the block to the correct size. I knew this would likely cause uneven seams, as shown above, but I was willing to chance it because I just wanted to get done 😉.

However, looking at it from a distance, it is noticeable, but not glaringly so. I can live with SOME seams not matching perfectly....

I also started a sewing group at The Old Craft Store called Scrap Bag Buddies. We decided to work on houses, the pattern is Village - Jumble: a Charm Patch mashup. Some internet places are selling this pattern, but it is available as a free PDF download at Fat Quarter Shop!


At least one more thing that I've been up to. I took over the EPP classes at the OCS. In my search for interesting EPP patterns I came across a blog that caught my eye for several reasons.
It's N.a. blog written by Naomi Alice. (k, do you see the first reason? We have the same first name!! 😍 what's not to like already?!!)
Her sew along used to be called "fussy cutting epp" then she changed it to "focus cutting epp." Her explanation for this change is very compelling!  I like it!
And cross blocks have been on my quilting bucket list forever! The 2020 Focus Cutting Sew Along is all about house shapes sewn together to make cross/plus blocks!

I'm not sure how far I'm going to go with these particular pieces. I just had to give it a try. I like to think I'll continue on to making a whole cross/plus sign quilt, but being honest with my self and seeing how many other projects I really want to get back to and finish... It's not very likely that I will coninue.
Also, I just saw somewhere that Naomi will soon be announcing what the "2021 Focus Cutting EPP" theme will be. I'll probably wait to see what that is before continuing here.


Thanks for stopping by! And reading to the end! I enjoy sharing what I do with you! 

Until next time, Happy Quilting! or Happy whatever-it-is-you-do 😊!


Saturday, October 3, 2020

found inspiration...

Hello again! I'm still here!  I had quite a bit going on in my personal life that was cutting into my quilting life. Much of that no longer requires my attention.  Plus, my Heartbeat and I are back to being empty-nesters. I seem to have more me time 😋.  (ya, you know the truth is I miss my kids!!)

Another thing... now that I work in a quilt shop, I was concerned about how much I should write about work related things... But I'll just go for it and continue writing about what I do!!

Ok! so no more explaining, I'll just pick up where I left off... here are some things I've been doing...

Back in June I told you about making a Multi Purpose bag  designed by HandyMum Lin in my blog update Two Projects. I really liked the technique and was inspired to make a little mat to put on the bottom of a wire basket that holds tea bags. 


It was a quick rough draft. I just went with it. I continued on to the next step so fast that I forgot about reversing the pattern when tracing it onto the fusible heavy interfacing. The shape is the same right or left, so it was good.


I couldn't resist some embroidery.


And even more embroidery.


Now, it's being used for it's intended purpose and barely visible! 😏 Well, I know it's there 🥰.


A couple weeks before Sweetling left for NYC, her suitemate had mentioned that she wanted doilies for their new apartment.
I can certainly make doilies!! I hope she liked them.


I am going to be teaching English Paper Piecing at The Old Craft Store. My first scheduled class is Oct 12. No one is signed up yet, but I love the opportunity to create projects.
I came across a book that was given to me a while ago, titled 1,001 Patchwork Designs. I believe it was published 1982. I'm taking inspiration from the traditional block designs and drafting them for EPP lessons for October, November and December.

To me, EPP is best used for Y-seams. Each of my blocks will have at least one Y-seam for teaching purposes. Here is my October block.


I don't really have time to make a whole quilt in EPP (besides, if you have been following me, you know I have a long long term Grandmother's Garden EPP project that I've been carrying around for many many years...) I decided to make this 6" block into a mini quilt and in the theme of hand stitched...

I hand quilted it.

Since I wanted to keep all of it hand stitched, I wrapped the backing around to the front to make the binding and used a large running stitch to sew it down.
The Old Craft Store has these mini-quilt hangers for sale, so I made a background quilt to hang and I can change the mini quilt for each month.


But the big project that has been getting most of my focus was the Tree of Life designed by Karen Arzamendi.
(It was the subject of my last update Putting my quilting whimsy out there.)  The Old Craft Store purchased patterns to sell at my request. My boss asked for my quilt top to be used as a store sample, and she was waiting to put the pattern out on the floor until she got my top! Although she assured me many times to take my time, I felt a need to get it done.


and now I'm happy that to have it hanging in the store classroom. With a potential class starting in January. If that class does happen, I'm planning to make this again with a chartreuse background! I'm looking forward to it!


With the relief of finishing my big project (for now) I'm turning my eye to the mess I've made while working on it and other small projects. I've spread out all over the house. I know I need to gather every thing up again and return it to the sewing room. However, I had let Sweetling take over the sewing room during the last month she was home.  I was so pleased that she wanted to make some clothing items! And I was so proud that she did it mostly on her own, just asking me to clarify a few of the pattern instructions.  I wish she would have allowed me some pictures to post here. She did a fantastic job!

Ok! so, I really do need to pick up AND reorganize... 
But I'm also helping to organize a Block-of-the-Month that the store will be offering in the new year. I looked through fabric sample books and picked the colors and prints I want for the quilt. I calculated how much fabric for each block. I added up the 12 months and handed the yardage totals to my boss day before yesterday. Phew, another task out of the way... for now.
It will look something like this...(I hope it's ok for me to post it, I wasn't told it's a mystery.. :p)


OK! so that's an EPP class, and an upcoming Block-of-the-Month... I am also hoping to start a scrap quilter's group at the store, Scrap Bag Buddies. The first meeting is scheduled this coming Monday. We'll be working on our own projects and getting to know each other. Eventually, we may have a block swap or pick the same pattern to work on individually but in a workshop/classroom setting. 
Sooo, today I've been happily avoiding picking up because I have to have some ideas to give to the group on Monday! 
I'm kind of giggling now, because at the beginning of this blog update I said, "No more explaining..." and I've just realized that this whole blog update is one long explaination on how I've found inspiration to do a blog update today... 🤔
I came across this video. I struggle with color theory. The way Judy Gauthier explains how to pick colors for scrap quilts really made sense to me and I wanted to share it, with everyone!  (and maybe I have some incentive to hit my sewing room too 😉.) I also have another book to add to my wish list - Rainbow Quilts for Scrap Lovers.
Thanks for coming to read my update. I hope to see you soon! Enjoy the video, maybe you'll see color a little differently. I think I will!


Sunday, August 9, 2020

I'm putting my Quilting Whimsy out there!

I am so excited! The Old Craft Store  will be selling Tree of Life quilt pattern by Karen Arzamendi!
This is an awesome pattern filled with several dimensional applique techniques.
I believe Karen was traveling when she started this quilt. She wanted some hand stitching to work on in the car while her husband drove. I don't know what the vision had started as, but how fun to grow a tree, branch by branch with stitches!


Around the beginning of 2017 Karen had asked me to proof-read this pattern for her. I miss mistook "proof-read" for "test out" and started a quilt top and blogged Can I do it....
While Karen may have started this as a take-along hand applique project, I have found the pattern lends itself very well to all types of applique techniques! I used raw-edge fused applique for the branch leaves, machine stitched bias tape for the branches, and needle turned the special flowers and leaves. 


My progress continues in my blog update  Well Dog Gone...,

I did get the center mostly done by that March. However, I never started the outside borders. 
Now that The Old Craft Store has picked it up, I am finishing my top and it will become a store sample!! I'm so excited and very happy for the incentive to get my needle working on it again!

One of the best parts about this... If I've completed all the store tasks for the day and no customers needing help, I can stitch on this because it will be displayed and maybe... possibly... it can become a class in the future, if there's interest!! I'm a bit giddy about this... there's nothing like this in the store at the moment. My boss is encouraging me to bring my quilting style. And I'm bringing this with fingers crossed! I hope it does well. Wish me luck!! Who knows what opportunities this can lead to 🤞🤞🤞
 

Wednesday, July 22, 2020

two projects...

Two projects,
Different as can be,
One is more me!!
~~~~~~~~

I have recently been watching more sewing and quilting YouTube videos.
HandyMum Lin has especially caught my interest. 
Many of her projects are produced with the basic needle and thread (and simple hand drawn templates that she gives dimensions so you can make your own.)
Her Applique idea / Hand stitch video had me completely entranced! I'd love to attempt it someday.

At the time I had started watching HandyMum Lin, I was working on the Christmas in July store sample quilt top. I showed you what fabrics I had picked out in my last blog update, Seam ripping and dream job.

The colors stacked look really good...


but once I got some blocks put together and on the design wall I immediately saw that the darkest fabric was much too dark for what I wanted.
I got a lighter blue. It felt better but still not exactly what I was going for.

I wasn't ready to give up on including that darkest fabric.  However, no matter where I put it, it's really too harsh. It takes away the softness of the winter blue. 


This is the end result and there are now two kits that will be put out for the Christmas in July event this coming Friday.


It's not a masterpiece, but it's not horrible either.
I have learned something through this whole experience... 
I really stressed over this quilt top because I was trying to guess what others would like.
What I need to do is pick what I like.  Oh, I know my tastes are not for everyone! But maybe it will appeal to one or more (🤞) others. Or maybe it will spark inspiration! 
Quilting is very diverse. My boss has stated many times that she wants variety. She encourages each of us to bring our quilting interests and styles to the store... I really have to trust who I am as a quilter. Perhaps I can be brave enough to bring some of Hita's Whimsy to the store.

⺿⺿⺿⺿
Once the Christmas in July store sample was handed over, I couldn't resist perusing more of HandyMum Lin's YouTube videos. 
I guess I was ready for something new and the Multi Purpose Storage Bag / Hand Stitch seemed to be exactly what I needed.
I used a fusible pellon interfacing (craft weight? but I'll have to double check on that) where she used hard lining fabric. 
The stitching technique is very similar to English Paper Piecing but you don't have to remove the papers. And stitching (instead of basting) the fabric to the interfacing gives a hand quilted look.


I didn't notice that I didn't have the rows arranged exactly like hers...


...and I got it all stitched together...


I even stitched one side of the zipper on, before I noticed that the zipper was supposed to be between two LONG  sides so that the triangle legs can be cinched over the zipper stops.

I also noticed that I should have used the triangle fabrics for the zipper stops and not the lining fabric...
but I continued on anyway. The zipper will end up on a corner instead of the middle, I'm ok with that.

very close to being done!

really it's not bad.

I like it a LOT.


not sure what I'll store in it.

I do want to make another one (maybe with the zipper in the suggested spot? though I do like it on the corner.)
Thank you, Ms. HandyMum Lin for your generosity in sharing your process with us. 
I love your videos. I love needle and thread projects.
I can see myself trying out a few more of your projects. Thank you!!