Sunday, May 31, 2020

Honeycomb piecing is done!


I've always wanted to take a picture of one of my quilts on a wooden fence.
Trying to do it by myself is difficult, especially with a tiny breeze easily flipping the single layer of fabric.  Yes, it's just a quilt top, and is going to be added to the to-be-quilted pile for a later date.
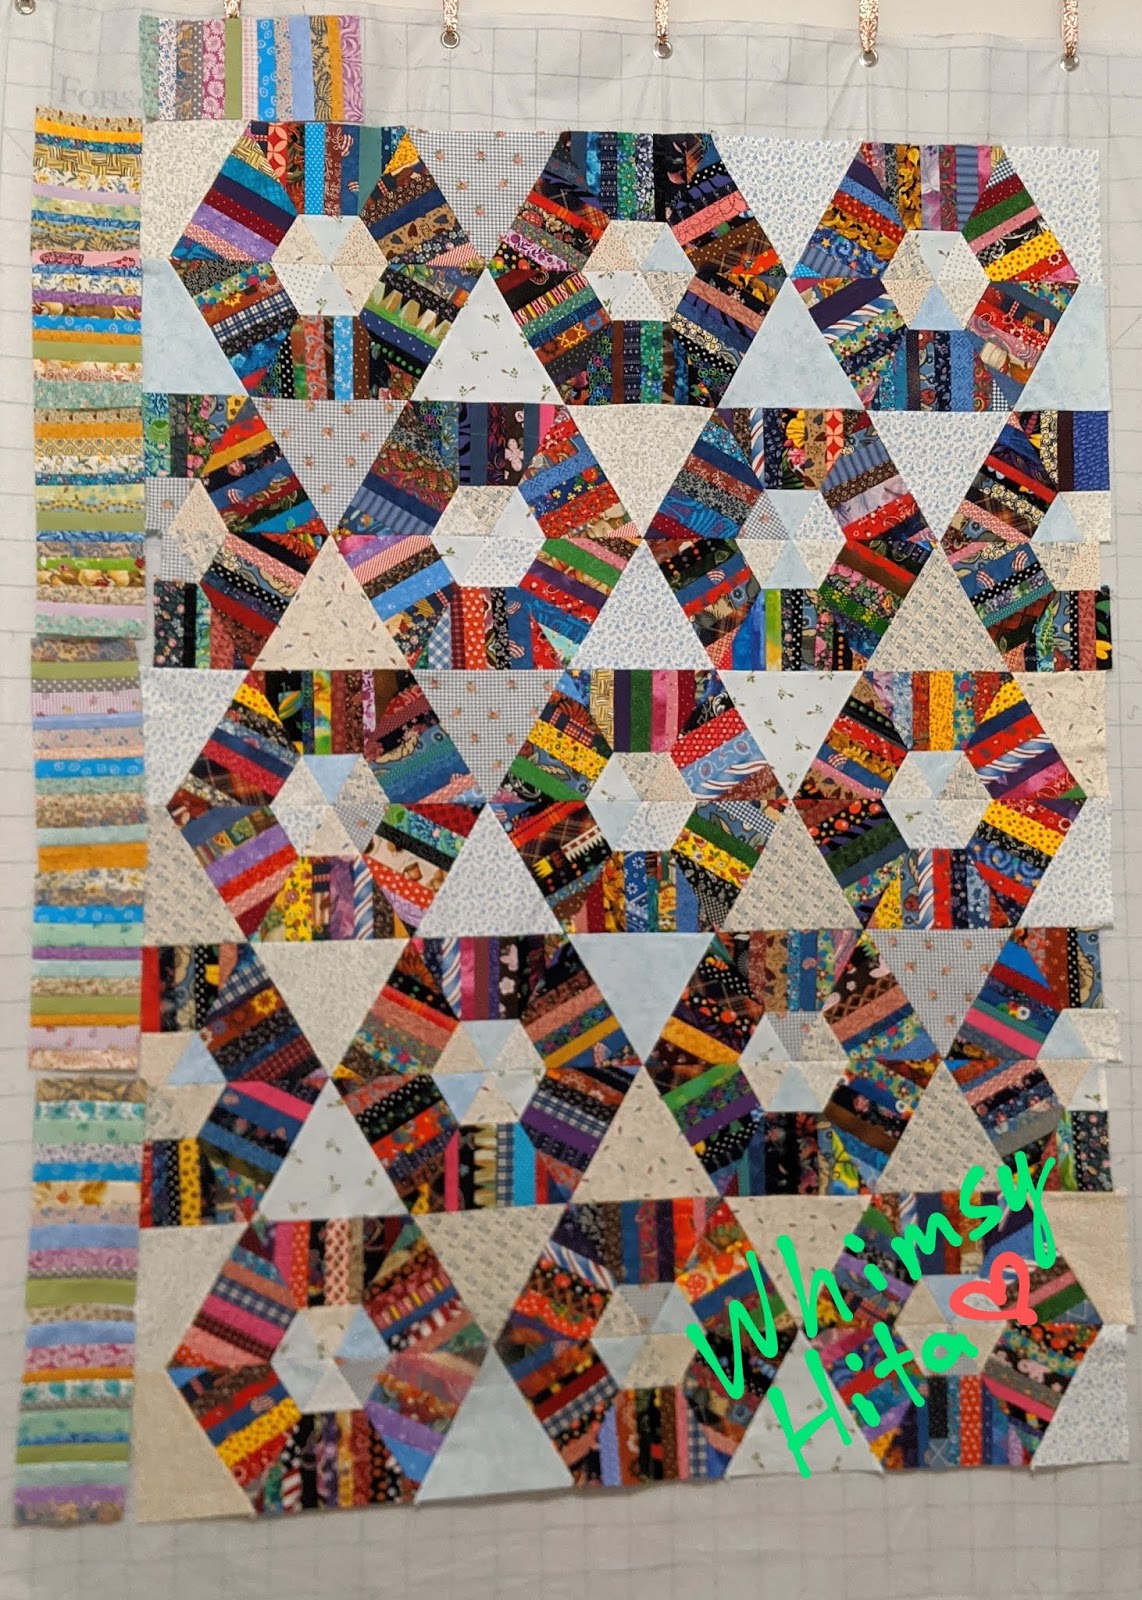
But I consider it a "done" for now!

Pieced by Naomi Perry from the Honeycomb quilt pattern by Karen Griska.


It doesn't look very big laid out on the floor. 
Pieced by Naomi Perry from the Honeycomb quilt pattern by Karen Griska.


I like having it out of the sewing room πŸ˜€. 
Feels like it's getting to see the "light of day" instead of being cooped in the sewing room.
(The picture on the fence was taken right after this.)
Oh, I'm so in love with it!! 😍 
Pieced by Naomi Perry from the Honeycomb quilt pattern by Karen Griska.


Ok! Now that I've celebrated this finish, I'm gonna take a tiny step back.
One thing I wanted to tell you is about what can sometimes happen when cutting borders.  
If you have to fold the fabric and cut, and the fold is slightly off, the strip is going to do a bit of a zig-zag. You can see how far the strip on the left bows to the left.

If you try to use that strip, it's going to cause a ripple in the border. 
See that bump where I'm pointing? This will cause more and more trouble as borders are added, making the quilt top ripple and difficult to square up at the end. There are other things that cause rippling, on this day this is the issue I had. 
 

There are a bunch of "how to put a border on your quilt" tutorials out there already.
I'm gonna give the quick quick look at how I attach borders.
 After I have made sure all my strips are straight, I get the measurement of the length of the quilt through the middle and the edges.  I leave an inch extra at each end so that I can be sure to have enough fabric to trim squarely. (Sometimes, if that end isn't cut straight or if the seam was off slightly, it could result in being a little short. So I prefer to trim after each side is attached, just in case.)

I mark both ends and the center with a pin (or a pencil mark).
If my top had a bit of rippling at this point, I would have added more registration marks, to be sure there wouldn't be stretching while sewing. 

This time my quilt top was nearly perfectly flat ( I was so happy!!)
I pinned the center mark on the border to the center of the quilt top...

And made sure the edge marks were right at the edge of the quilt top.


Everything was nice and flat and fit perfectly together. I added more pins to make sure it would stay that way while I sewed.

I fed this through the machine with the border up. The idea is that the pieced side will have more give and will tend to stretch.  Having the pieced side on the bottom will allow the feed dogs to grip the fabric and keep it moving through evenly.
I sew from pin to pin and assess each section separately. A little bit of tension can be added while holding onto the next pin if there's a little extra fabric on one side or the other. But if that extra is more than a 1/4 inch, it's going to cause rippling. I would remove the top from the machine and re-evaluate the measurements and see where the correction needs to be made.
However, everything worked perfectly on this top!! ❤
Repeat the whole process for the top and bottom strips, and then for all remaining borders.
Two inner borders, a stripped pieced border and an outer triangles border! Phew!
It all went together so well, I didn't think to take more pictures with each border!
And now it's DONE!

The design wall is empty again... what will go up next??


Monday, May 18, 2020

whimsy strikes again

And the blessings just keep pouring in!! 
... from every direction.
and the energy is flowing!! 
Progress on the Honeycomb quilt top seems to be buzzing along!
Honeycomb quilt, pattern by Karen Griska

In March, when I constructed my 108" design wall, I placed the Honeycomb pieces constructed so far on it to show the wall off... I was also hoping that seeing the project up there would inspire me to work on it.

I might have pieced one little scrappy rectangle at that time. But soon the pieces were put back into the box for another day. Even though I already had a pile of strings trimmed and ready to stitch together.  It wasn't striking my whimsy.

Then something about making up the Village houses, blogged about in my previous update "Angels and opportunites with perfect timing, sparked that whimsy!


Out came the Honeycomb box and "zoom" went my sewing machine!


This Honeycomb quilt was started in Sept 2019.  Watana Cantrell offered it as a class at her Wanna Bees quilting Beehive in Vernon, AL.
I borrowed this picture she took of me in class from her Facebook feed. Lol, I really didn't get much done in class that day πŸ˜‹. Our move to Texas was just getting put into the works, my mind was swimming with moving tasks that I needed to start.


But now that my whimsy is sparked, piecing strings is very fast! You just sew piece after piece together. You don't have to worry about perfect seams, or straight seams, or intersections! Just make sure there's enough seam allowance to hold over time.
The pattern calls for 1.25" and 1.5" string strips. I used any strings in my scrap bag. I chose to keep the longer strings that were 1.5" wide for the Herringbone scrappy quilt instead of cutting down for this project.
But any strip of fabric slightly smaller than 1.5" wide and at least 3/4" wide was stitched in.
As long as there would be a sliver showing, it went in!


But, it's not a good idea to place those thinner strips at the corners... it causes too much bulk in the seams... hah, these corner pieces are almost smaller than my finger tip! It works, but it's not ideal.

When I was getting close to having all the honeycomb parts I started thinking about the next step of piecing in the background.  I thought a darker background would make the colors pop.


I was surprised that the dark blue background made it look really busy. Probably because I already had the light centers.
So I went back to the original plan and light scrappy backgrounds.

I altered the pattern slightly. I wanted all rows of the honeycomb to reach the borders.
My Heartbeat says he can see a secondary star pattern if the honeycomb is full.

I was taking each piece off the wall and stitching. Using crumb pieces inbetween for continuous chain piecing. And when I got confident enough to take two pieces down instead of the crumbs, this is what happened....

It was an easy fix. I'll admit it wasn't the only seam ripping action.
I did end up moving the rows around because the yellow at the top was bothering me.
I think the colors are more even now. 
At any rate, the center is all pieced together, and that's how it's gonna live.

You can already see the border piecing in the previous pics.
I was surprised to find so many lighter fabrics in the scrap pile.
It's a pretty mess, but still a mess and has me thinking I need to give the scrap pile some attention soon! At least, the pile will be reduced greatly by time the border is completed. πŸ˜‰

On a slightly different note... I just reviewed my last blog update. I was smugly admiring my finished quilt top from the Laundry Basket mystery 2020...
Yep!!! can you spot the mistake(s)? It's a symmetrical mistake anyway. 
*sigh* I tell you, the seam ripper never gets put away.
That's ok.  May this quilting whimsy of mine continue. 
Thank you for dropping by!!

Sunday, May 10, 2020

Angels and opportunites with perfect timing

I haven't been blogging because I haven't been able to wrap my head around what's going on with this Covid-19 thing that has turned all of our lives upside down and inside out. 
Honestly, I'm still not ready to put my emotions and reactions into words yet, I doubt I ever will. Besides, this blog is about quilting and crafting! Time to get on with it 😘.

Last week I was in a particular emotional low. (For goodness sakes, I resorted to baking bread 😳 in an attempt to snap out of it.)

Then out of the blue, my quilting friend Carol Punday from Mississippi, made an Instagram post and also shared in Facebook, that she started making this Village quilt by Moda Fabrics.
When she suggested it would be a great block to swap, I jumped at the opportunity!
Today, these house blocks from her to me were in my mailbox! 
Aren't they fun?!!
I love that zigzag house! Can you imagine the eccentric lady that lives there?
And the Greenhouses! I've always thought it would be fun to have a greenhouse and raise interesting plants.
And the Butterfly Habitats! Have you ever sat in a butterfly house and watched them flutter all around you, sometimes brave enough to perch on your shoulder and say hello? I could sit in a butterfly habitat for hours, it's so peaceful. There's one here in Dallas, TX that I will have to go visit when everything opens again.


These are the house blocks I sent to her.


I enjoyed the construction of each of them.
This is the Texas house with Blue Bonnets and Cactus.

I was tickled with making an Ocean-front Property house. (Oops, I changed the roof to a seahorse print and forgot to get an updated picture.)

And giggled over building a Chicken Coup. See the chicken wire walls? 

And a Coffee House (even though I prefer lattes over espresso. πŸ˜‹)

And I called this the House of the Rising Sun.
"There is a house in New Orleans, they call the Rising Sun..."


I attempted building a house with a fireplace...
but my Sweetling said that I burned the house down. (I'm keeping this block for myself for the memory πŸ₯°.)

Carol's offer of a block swap was perfect timing!
~~~~Oh! BTW, Carol has been a great inspiration to me long before this. She's a prolific quilter. And is always sharing what she's working on in IG and FB.
 #emptyclosetquilting is her unique IG hashtag. Have a look!~~~~

...back to perfect timing...

 ...because I happened to have just finished putting together the mystery quilt by Edyta Sitar from Laundry Basket Quilts, but haven't decided on a border yet. I'll have to think on it for a while.
and I'm between projects now, even though I have plenty projects that need working on... I just didn't have the "umph" to pick one of them up.

...because I had looked at the Village pattern before, just in November when we moved into this house. But it wasn't the right time for me to jump into a project like this. I was working on several quilting deadlines at that time that required concentration. And unpacking, trying to organize my sewing room.
...because, as an added incentive, the pattern is free now!! As of April 10, Moda generously provided it as their contribution to ease the stay at home new normal for us quilters.
One Village - Together
...because I can give  myself permission to beginning the Village quilt knowing that it's going to be a long term project. I'll make a block here and there when a scrap of fabric just has to be made into a house!

Perfect timing also because I've been going through my scraps.
For a moment, I've been blindly sewing pieces of fabrics together, as inspired by this Tracks Herringbone Quilt Block by Patchwork Facil on YouTube.
This is a fantastic stash buster!!
But throwing in some of those bigger pieces with interesting prints only to be cut into 1.5 inch strips is a little difficult!
Now, the bigger, more interesting pieces can be used for the Village houses before the piece makes it into the Herringbone pattern!
It feels like a Bonus!
Like, two projects in one πŸ₯°.

Ok. So, working on the Herringbone quilt and Village Houses is producing smaller fabric scraps.
Now I'm getting strips of fabric that are less than 1.5" wide. These strips are perfect for the "strings" I've been using in the Honeycomb quilt that I started last year with Watana Cantrell at the Wanna Bees in Vernon, AL.

The pattern is Honeycomb by Karen Griska.

Until a few days ago, I only had about 10 of the 78 required triangle units. Now, I only need a few more to go!! I'll start filling in the background pieces this week!
Oh! It feels so good to see progress in my work!
And THREE projects in one!

And that's what happens when an angel appears and offers an opportunity.
That's what happens when you're open to opportunity and say, "Yes! I'm in!"
One thing leads to another leads to another... (leads back to something already started...)
Inspiration and progress. Yes, that's what happens!
I am ever so grateful for angels and opportunities with perfect timing!!
(what will inspire the other 25+ projects that are patiently waiting for me to pick up again?... lol. πŸ‘ΌπŸ˜œ)

Wishing all the mamas out there a very Happy Mother's Day 😍